one will cause the other to drill down similarly.
Workspace Screen
This manual is in pilot operation.
|
The workspace screen is used for the following purposes by the business unit responsible for the source and destination of packages, as detailed in the submission source and destination:
[When used as a source]
-
Inputting data to be submitted as a package
-
Checking and submitting package data
-
Confirming the acceptance/approval status of submitted packages
-
Withdrawing package data
[When used as a destination]
-
Accepting submitted packages
-
Confirming the contents of accepted packages
-
Approving or returning accepted packages
For details on submission, withdrawal, acceptance, approval, and return, please see the sections on "Package Submission" and "Actions on Packages".
fusion_place >= 12.1
Configuration of the Workspace Screen
Below is an example of the initial display of the workspace screen:
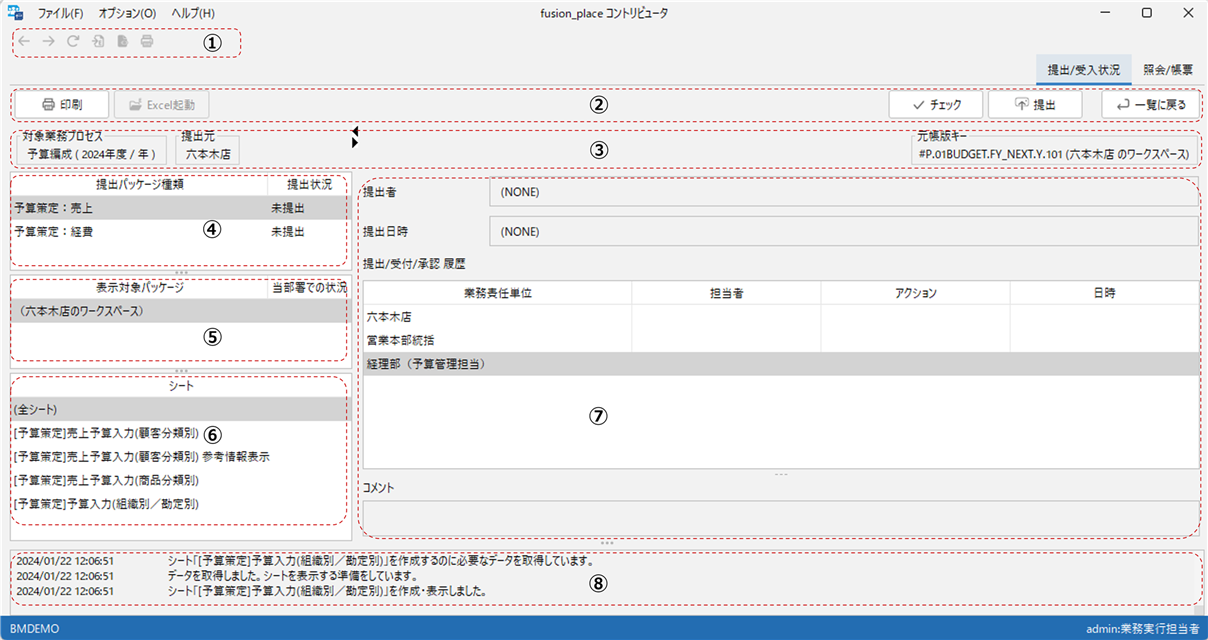
① Toolbar
Icons for operating the sheet are placed here.
1. Back (←) & Forward (→) |
Back (←) returns to the previous form. Forward (→) advances to the next form. |
2. Reload |
Re-displays the screen based on the latest data from the database. |
3. Excel Export |
Exports the data of the displayed sheet to Excel. Excel is automatically launched. ※ |
4. Preview |
Previews the displayed sheet. It is also possible to print the sheet from the preview screen or export it to a PDF file. |
5. Print |
Prints the displayed sheet. |
※ When pressing the Excel Export button, data is first exported to a CSV file, which is then opened in Excel. The CSV file is created in the .fusionplace subfolder within the Windows user folder (C:\Users\(username)).
②
Buttons for operating the workspace data and submission packages are placed here. The buttons that appear vary depending on the situation. Below, the conditions for each button’s appearance and its effects are explained.
1. Print |
[Button display condition] Prints the selected sheet (if no sheet list is displayed or if "All Sheets" is selected, all sheets are printed). |
2. Excel Launch |
[Button display condition] Launches Microsoft Excel and opens the package input Excel file. |
3. Check |
[Button display condition] Checks the content of the workspace data for the selected sheet (if no sheet list is displayed or if "All Sheets" is selected, all sheets are checked). |
4. Save |
[Button display condition] Becomes clickable when sheet data is modified in section ⑦. Pressing it saves the data to the database. |
5. Submit |
[Button display condition] Creates a package based on the workspace data and submits it. A check is performed before submission, and submission is not allowed if there are errors. |
6. Proxy Submission |
[Button display condition] By pressing this button, a package is created based on the workspace data and submitted. |
7. Withdrawal |
[Button display condition] Withdraws a submitted package. Note, it is not possible to withdraw a package that has already been withdrawn or returned. |
8. Proxy Withdrawal |
[Button display condition] By pressing this button, a submitted package is withdrawn. |
9. Re-import |
[Button display condition] Re-imports a submitted package into the workspace. Note, if working as a source, only packages that have been previously accepted can be re-imported. |
10. Acceptance |
[Button display condition] Accepts a submitted package. |
11. Return |
[Button display condition] Returns a submitted package. |
12. Approval |
[Button display condition] Approves a submitted package. |
13. Return to List |
[Button display condition] Returns to the submission/acceptance status overview screen. |
③
Displays key information of the workspace.
1. Target Business Process |
Displays the business process to which the workspace belongs. |
2. Submission Source |
Displays the business unit responsible for the package submission selected as the query target. This business unit is specifically as follows: [When working as a source] ・Your own business unit [When working as a destination] ・The "submission source business unit" selected on the submission/acceptance status list Note, if moving to this screen from the submission status list, you are working as a source, and if from the acceptance status list, as a destination. |
3. Ledger Key |
Displays the ledger key associated with the workspace. |
④ Submission Package Types
Lists the types of submission packages for which the submission source is responsible within the target business process. The submission status for each type is also displayed (the same as in the Submission Status List "status").
⑤ Display Target Packages
Displays a list of packages submitted by the submission source within the target business process. The status of each package is also displayed. When a package is submitted, a new row is added here. Even if a package is withdrawn, it is not deleted and continues to be displayed in this list.
The first row of the list displays "(Workspace of XXXX)". The XXXX part will be filled with the name of the business unit that owns this workspace.
By selecting a row (and also selecting a row in the sheet list), the status and content of that package can be displayed in section ⑦. Selecting the first row, which displays "(Workspace of XXXX)", will show the content of the workspace belonging to the business unit indicated in the XXXX part.
When working as a destination, the displayed submission packages, etc., are those submitted by the submission source displayed in the "business unit" column, but please note that the first row of the above list displays the workspace of the destination business unit, not the submission source’s workspace.
⑥ Sheets
(Not displayed if "Hide Form" is set to ON in the Submission Package Definition)
Displays a list of sheets included in each submission package. Sheets correspond to individual forms included in the form list applied in the submission package definition. Selecting an individual sheet displays its content.
The first row displays "(All Sheets)". Selecting this displays information about the entire package (below) instead of sheet content.
※ When working as a destination, if the selected submission package in the display target package list is before acceptance, the sheet list, excluding "(All Sheets)", will be grayed out, and individual sheets cannot be selected. Sheets become selectable upon package acceptance.
⑦
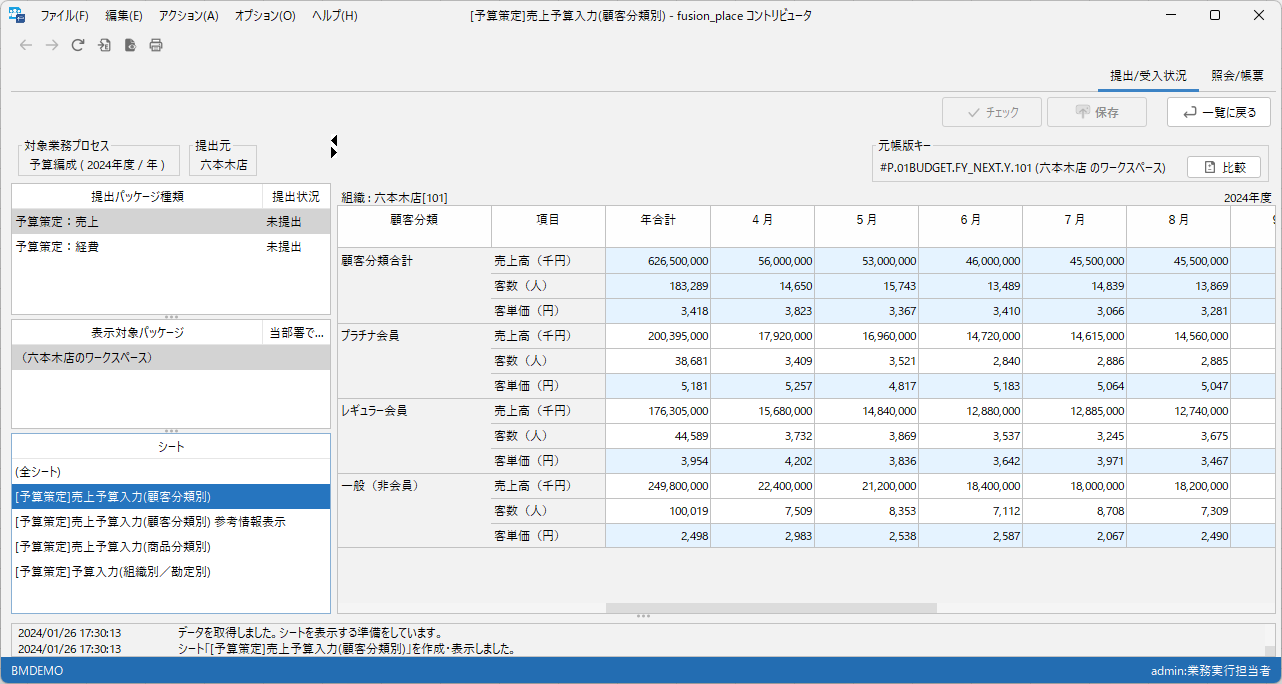
Depending on the selection in the sheet list, one of the following is displayed:
-
When an individual sheet is selected … The content of the sheet
-
Clicking the left-pointing triangle icon in the middle allows for full-width display of the table. Subsequently, clicking the right-pointing triangle icon returns it to its original state.
-
The "Ledger Key" column displays a Compare button. Clicking this switches the content display screen to the comparative format.
-
-
When the "(All Sheets)" row is selected … Information about the entire package (below)
The content of "Information about the entire package" differs depending on whether the workspace is selected or an individual submitted package is selected in the display target package list:-
If the workspace is selected … The "Submission/Acceptance/Approval History" section displays the submission route corresponding to the submission package type.
-
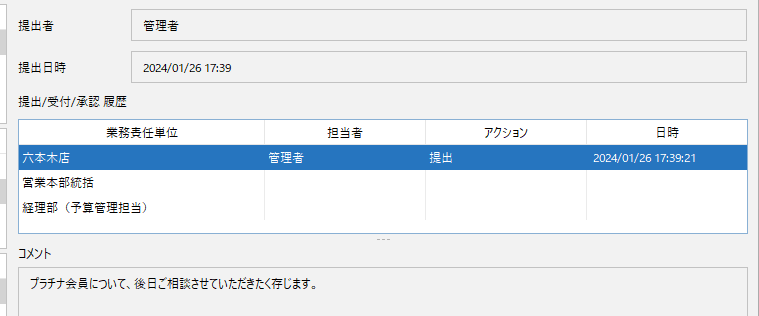
If an individual package is selected … Information about that submission package is displayed:
-
Submitter
-
Submission Date and Time
-
Submission/Acceptance/Approval History
-
Comments made at the time of actions such as submission/acceptance/approval (displayed when a row in the above history is selected)
-
-
⑧
Displays messages indicating the results of operations such as package submission, acceptance, approval, etc., performed by the user.
Column Width Adjustment
You can adjust the width of columns on the screen by dragging the boundaries of the columns. Changing the width of one column will also change the width of other columns of the same type (specifically, multiple columns displayed based on a single column definition). The changed column width applies only to your PC.
The result of the change is saved, but if the form’s definition content is changed, it is reset to the initial state.
To reset the changed column width, select from the menu and choose whether to reset for "this form" or "all forms".
Comparative Format Screen
The content display screen when a sheet is selected can be switched to a "comparative format". In comparative format, the content of the currently selected display target package (including the workspace) and the content of any display target package (same) are displayed in a symmetrical format on the left and right, with differences highlighted in yellow (details are in the below).
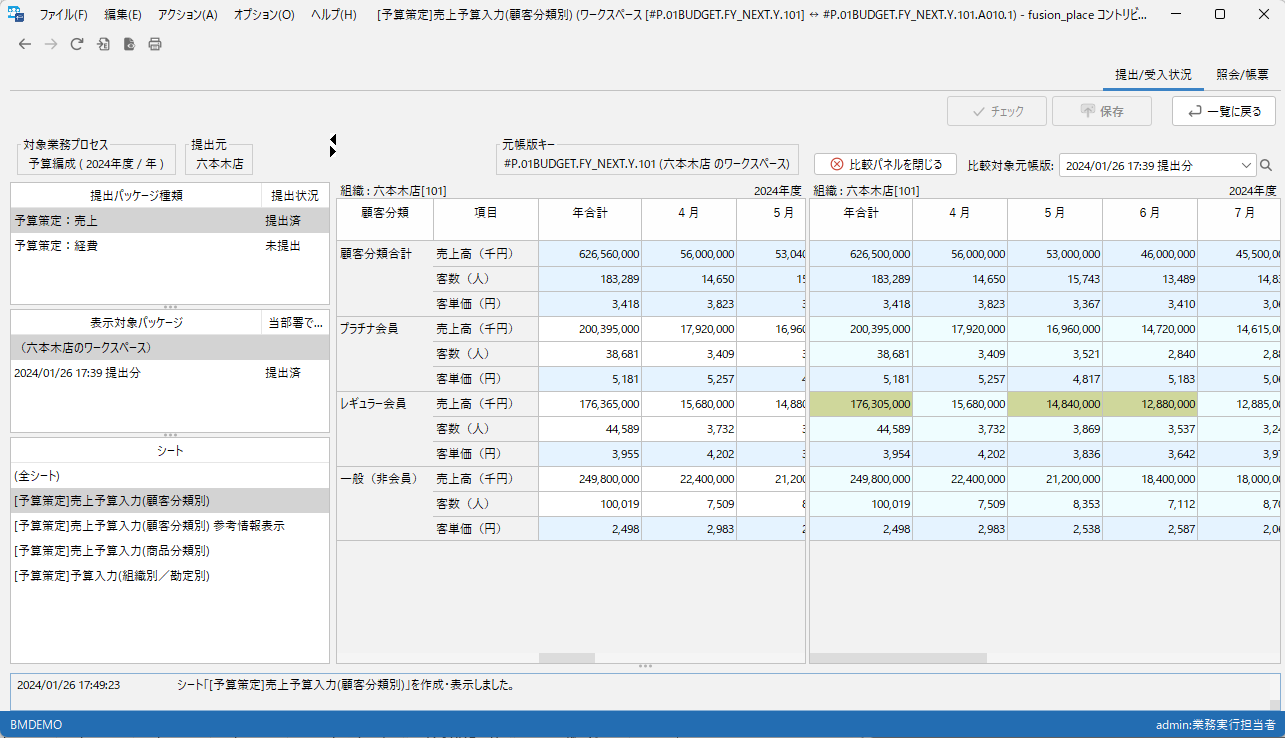
The following operations are possible on the right-side comparison panel.
1. Close Comparison Panel |
Clicking closes the comparison panel. |
2. Select Comparison Ledger Key |
Selects the comparison target data. Workspace and submission package data can be selected. |
The comparison source panel (left side) and the comparison panel are linked. Clicking on a column/row or cell to drill down in
fusion_place < 12.1
Configuration of the Workspace Screen
Below is an example of the initial display of the workspace screen:
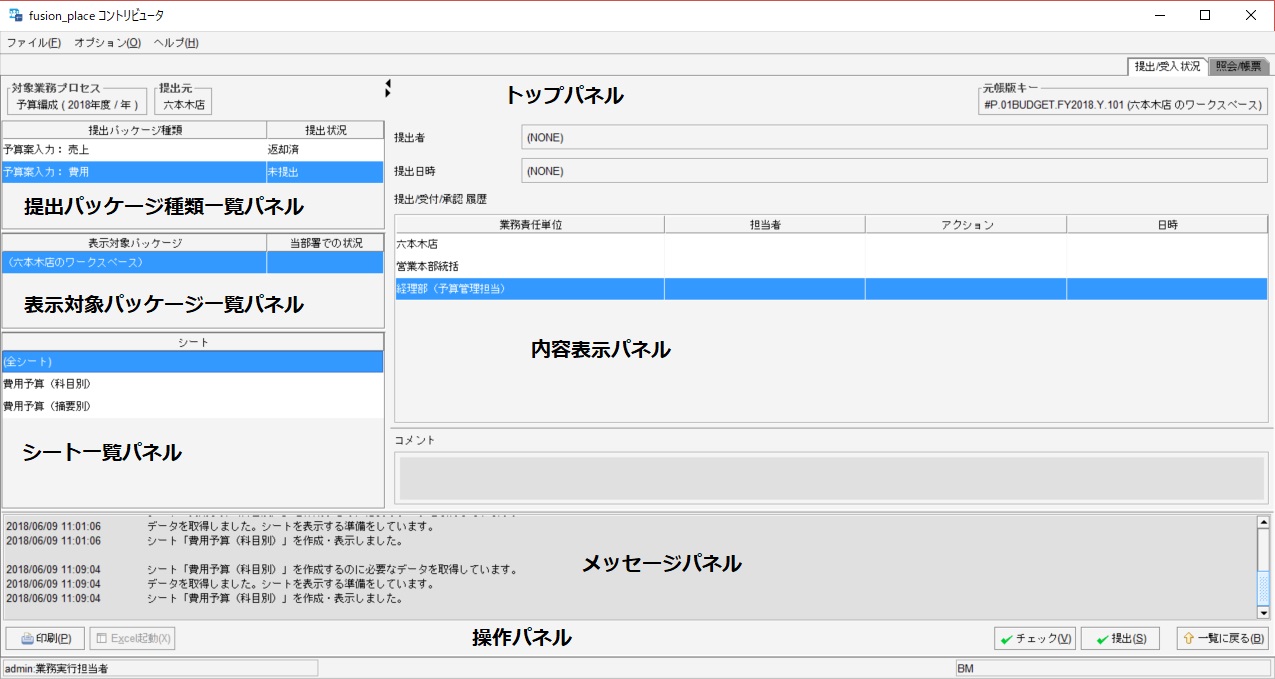
Top Panel
Displays key information of the workspace.
1. Target Business Process |
Displays the business process to which the workspace belongs. |
2. Submission Source |
Displays the business unit responsible for the package submission selected as the query target. This business unit is specifically as follows: [When working as a source] ・Your own business unit [When working as a destination] ・The "submission source business unit" selected on the submission/acceptance status list Note, if moving to this screen from the submission status list, you are working as a source, and if from the acceptance status list, as a destination. |
3. Ledger Key |
Displays the ledger key associated with the workspace. |
Submission Package Types List Panel
Lists the types of submission packages for which the submission source is responsible within the target business process. The submission status for each type is also displayed (the same as in the Submission Status List Panel "status").
Display Target Packages List Panel
Displays a list of packages submitted by the submission source within the target business process. The status of each package is also displayed. When a package is submitted, a new row is added here. Even if a package is withdrawn, it is not deleted and continues to be displayed in this list.
The first row of the list displays "(Workspace of XXXX)". The XXXX part will be filled with the name of the business unit that owns this workspace.
By selecting a row (and also selecting a row in the sheet list panel), the status and content of that package can be displayed in the content display panel. Selecting the first row, which displays "(Workspace of XXXX)", will show the content of the workspace belonging to the business unit indicated in the XXXX part.
When working as a destination, the displayed submission packages, etc., are those submitted by the submission source displayed in the "business unit" column, but please note that the first row of the above list displays the workspace of the destination business unit, not the submission source’s workspace.
Sheet List Panel
(Not displayed if "Hide Form" is set to ON in the Submission Package Definition)
Displays a list of sheets included in each submission package. Sheets correspond to individual forms included in the form list applied in the submission package definition. Selecting an individual sheet displays its content in the content display panel.
The first row displays "(All Sheets)". Selecting this displays information about the entire package (below) in the content display panel instead of sheet content.
※ When working as a destination, if the selected submission package in the display target package list is before acceptance, the sheet list, excluding "(All Sheets)", will be grayed out, and individual sheets cannot be selected. Sheets become selectable upon package acceptance.
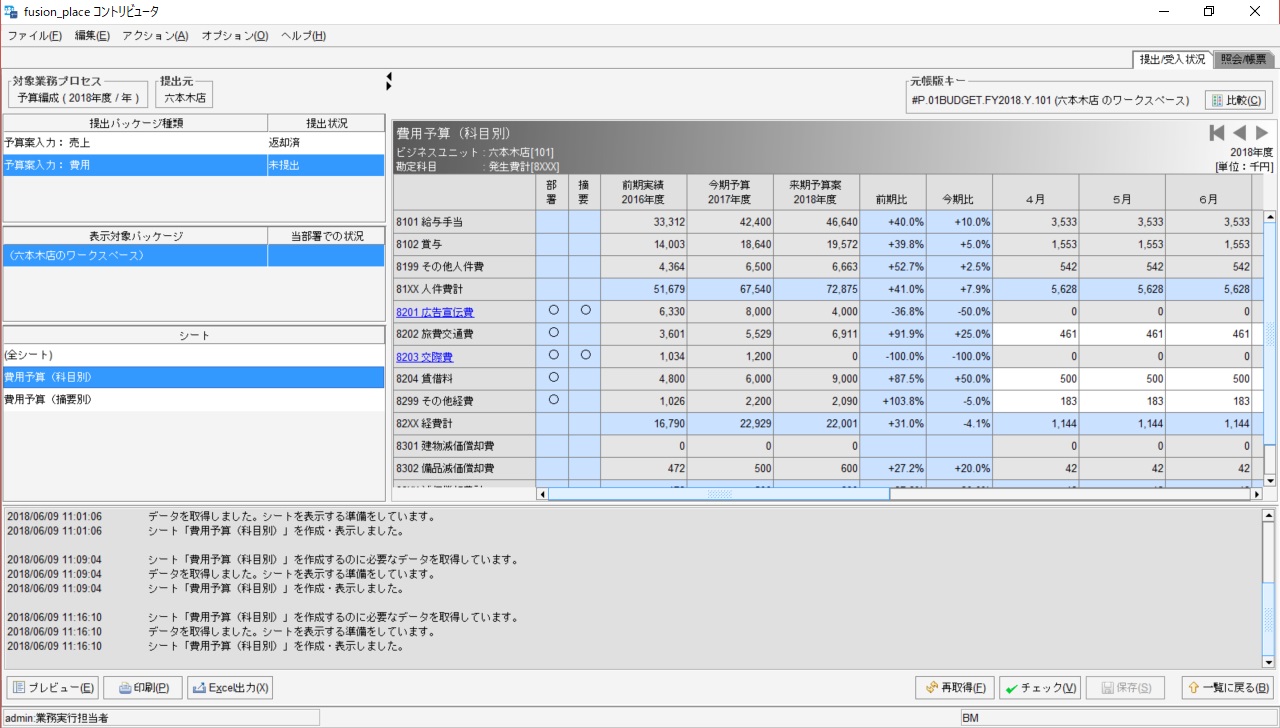
Content Display Panel
Depending on the selection in the sheet list panel, one of the following is displayed:
-
When an individual sheet is selected … The content of the sheet
-
Clicking the left-pointing triangle icon in the middle of the top panel allows for full-width display of the content display panel. Subsequently, clicking the right-pointing triangle icon returns it to its original state.
-
The "Ledger Key" column displays a Compare button. Clicking this switches the content display screen to the comparative format.
-
-
When the "(All Sheets)" row is selected … Information about the entire package (below)
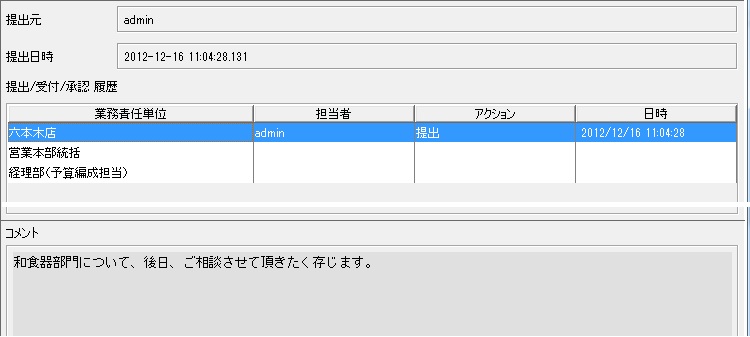
The content of "Information about the entire package" differs depending on whether the workspace is selected or an individual submitted package is selected in the display target package list:-
If the workspace is selected … The "Submission/Acceptance/Approval History" section displays the submission route corresponding to the submission package type.
-
If an individual package is selected … Information about that submission package is displayed:
-
Submitter
-
Submission Date and Time
-
Submission/Acceptance/Approval History
-
Comments made at the time of actions such as submission/acceptance/approval (displayed when a row in the above history is selected)
-
-
Message Panel
Displays messages indicating the results of operations such as package submission, acceptance, approval, etc., performed by the user.
Operation Panel
Buttons for operating the workspace data and submission packages are placed here. The buttons that appear vary depending on the situation. Below, the conditions for each button’s appearance and its effects are explained:
[Button display condition]
-
The sheet list panel is displayed, and,
-
A specific sheet is selected on the sheet list
Previews the selected sheet. Sheets can be printed from the preview screen or saved as a PDF file.
[Button display condition]
-
Always displayed
Prints the selected sheet (if the sheet list panel is not displayed or "All Sheets" is selected, all sheets are printed). If a workspace is selected, the workspace data is printed, and if a specific submission package is selected, that data is printed.
(3) Excel Export
======= [Button display condition]
-
The sheet list panel is displayed, and,
-
A specific sheet is selected on the sheet list
Exports the content of the selected sheet to Excel (Excel is automatically launched).
※ When pressing the Excel Export button, data is first exported to a CSV file, which is then opened in Excel. The CSV file is created in the .fusionplace subfolder within the Windows user folder (C:Users\yen;(username)).
(4) Excel Launch
======= [Button display condition]
-
The sheet list panel is not displayed, or,
-
"All Sheets" is selected on the sheet list
Launches Microsoft Excel and opens the package input Excel file.
※ Unlike the Excel Export button, which exports the data displayed on the screen to Excel, the Excel Launch button opens an Excel file that has been previously set up with [Excel-Link] settings, regardless of the screen display. This Excel file allows not only displaying data but also inputting data.
※ If no Excel file is registered in the link:https://docs.fusionplace.net/manual/en/concepts
/process/process_def.html#PackageDef[Submission Package Definition], this button cannot be pressed.
※ When working as a destination in the workspace screen (depending on access control settings, but usually), the Excel file opened here will be read-only.
[Button display condition]
-
The sheet list panel is displayed, and,
-
A specific sheet is selected on the sheet list
Re-displays the screen based on the latest data from the database.
[Button display condition]
-
A workspace is selected
Checks the content of the workspace data for the selected sheet (if the sheet list panel is not displayed or "All Sheets" is selected, all sheets are checked).
The content of the displayed sheet is checked. Note, the check conditions are defined in the form as "Validation Rules". If no validation rules are defined in the form, this button cannot be pressed.
[Button display condition]
-
A workspace is selected, and,
-
A specific sheet is selected
Becomes clickable when sheet data is modified in the content display panel. Pressing it saves the data to the database.
[Button display condition]
-
Working as a source,
-
A workspace is selected, and,
-
The sheet list panel is not displayed, or "All Sheets" is selected on the sheet list
Creates a package based on the workspace data and submits it. A check is performed before submission, and submission is not allowed if there are errors. Also, if there are already submitted packages, a new package cannot be submitted without withdrawing the existing ones first.
(9) Proxy Submission
Almost the same as the Submit button, but displayed only when working as a destination and the submission route settings allow the business unit to submit on behalf of the source. By pressing this button, a package is created based on the workspace data and submitted. If there are already submitted packages, a new package can be submitted after performing a proxy withdrawal.
[Button display condition]
-
Working as a source,
-
A submitted package is selected, and,
-
The sheet list panel is not displayed, or "All Sheets" is selected on the sheet list
Withdraws a submitted package. Note, it is not possible to withdraw a package that has already been withdrawn or returned.
(11) Proxy Withdrawal
Almost the same as the Withdrawal button, but displayed only when working as a destination and the submission route settings allow the business unit to submit on behalf of the source. By pressing this button, a submitted package is withdrawn.
[Button display condition]
-
A submitted package is selected, and,
-
The sheet list panel is not displayed, or "All Sheets" is selected on the sheet list
Re-imports a submitted package into the workspace. Note, if working as a source, only packages that have been previously accepted can be re-imported.
[Button display condition]
-
Working as a destination,
-
A submitted package is selected, and,
-
The sheet list panel is not displayed, or "All Sheets" is selected on the sheet list
Accepts a submitted package. By accepting, the package sheets become queryable, and the data is imported into the workspace. Acceptance is limited to packages that have not been withdrawn or returned and have been approved by the submission destination immediately preceding the current business unit.
[Button display condition]
-
Working as a destination,
-
A submitted package is selected, and,
-
The sheet list panel is not displayed, or "All Sheets" is selected on the sheet list
Returns a submitted package. Note, return is limited to packages that have not been withdrawn or returned and are currently located at the current business unit.
[Button display condition]
-
Working as a destination,
-
A submitted package is selected, and,
-
The sheet list panel is not displayed, or "All Sheets" is selected on the sheet list
Approves a submitted package. Note, return is limited to packages that have not been withdrawn or returned, and the current department’s status is "before approval", meaning it has been accepted but not yet approved.
Column Width Adjustment
You can adjust the width of columns on the screen by dragging the boundaries of the columns. Changing the width of one column will also change the width of other columns of the same type (specifically, multiple columns displayed based on a single column definition). The changed column width applies only to your PC.
The result of the change is saved, but if the form’s definition content is changed, it is reset to the initial state.
To reset the changed column width, select from the menu and choose whether to reset for "this form" or "all forms".
Comparative Format Screen
The content display screen when a sheet is selected can be switched to a "comparative format". In comparative format, the content of the currently selected display target package (including the workspace) and the content of any display target package (same) are displayed in a symmetrical format on the left and right, with differences highlighted in yellow (details are in the below).
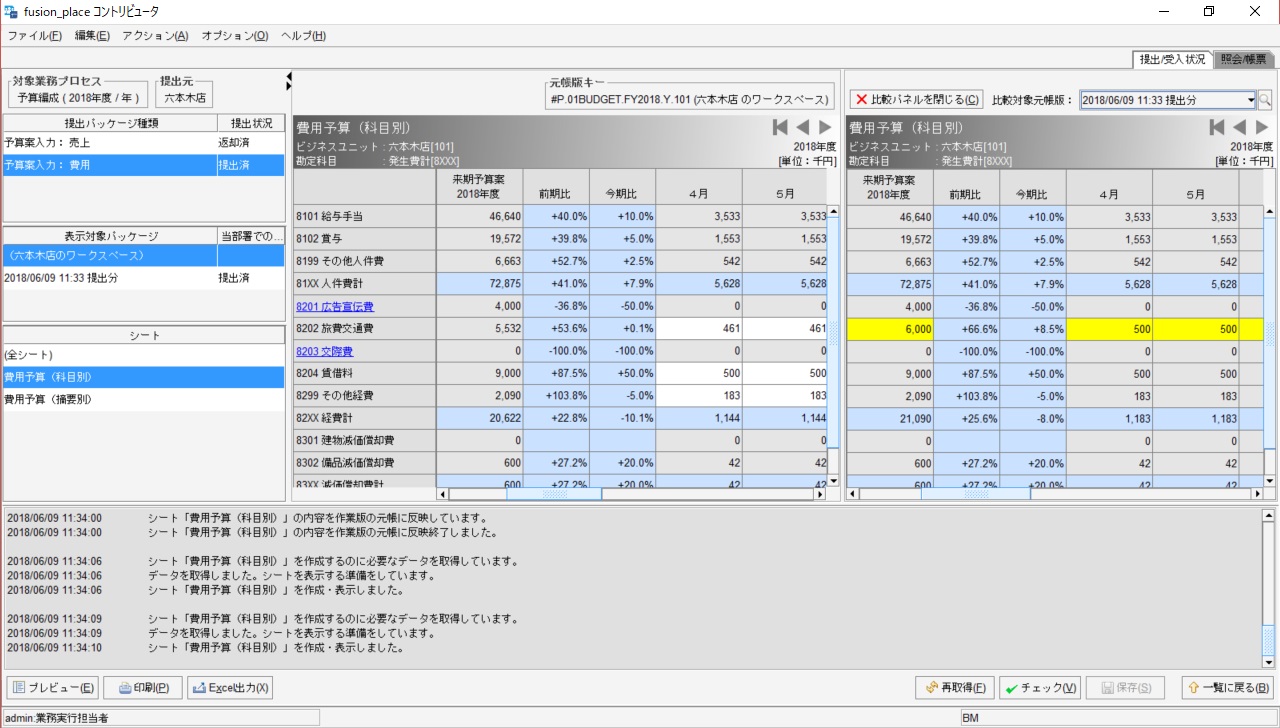
The following operations are possible on the right-side comparison panel.
1. Close Comparison Panel Button |
Clicking closes the comparison panel. |
2. Select Comparison Ledger Key |
Selects the comparison target data. Workspace and submission package data can be selected. |
The comparison source panel (left side) and the comparison panel are linked. Clicking on a column/row or cell to drill down in one will cause the other to drill down similarly.