Overview of Simple Forms
This manual is in pilot operation.
|
In Simple Forms, you select a Source ledger and assign its constituting dimensions to the vertical or horizontal axes to specify the layout of reports and screens. Dimensions can be assigned to the following:
- Parameters
-
Parameters refer to "items specified at runtime." For dimensions assigned here, users are prompted to select members before actually displaying the report or screen.
- Horizontal axis
-
The horizontal axis (column-wise direction) of the report or screen.
- Vertical axis
-
The vertical axis (row-wise direction) of the report or screen.
- Background
-
For a dimension that you do not want to assign to parameters, vertical, or horizontal axes but apply the same member across all items of the report or screen, assign it to the "Background."
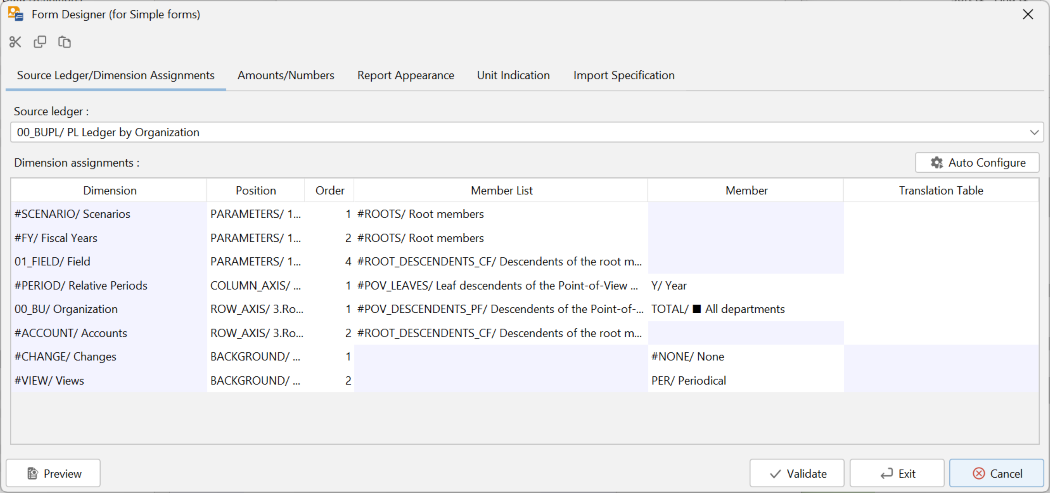
Below is an example of the Simple Forms configuration screen (Form Designer):
(Selecting a Source ledger and clicking the Auto Configure button on the top right of the screen automatically sets the dimension assignment conditions. You can then make necessary adjustments to quickly proceed with the settings.)
Dimension assignment conditions (table at the bottom of the above screen) explanation for each item is as follows:
Order
Multiple dimensions can be assigned to parameters, horizontal axes, vertical axes, and background. Here, you can specify the order of dimensions within each assignment target.
-
For "Parameters," dimensions with a lower order are displayed at the top in the prompt screen.
-
For "Horizontal axis" and "Vertical axis," dimensions with a lower order form the larger (outer) loops.
-
For "Background," order does not have any significance.
If there are multiple dimensions with the same "Position" and order, they are considered in the order of their dimension labels (alphabetical order). In the screen above, dimensions are sorted according to the order explained here.
Member List
For dimensions assigned to anything other than "Background," specify a Member List.
-
For "Parameters," this member list is used to display a list of selectable members in the prompt.
-
For "Horizontal axis" and "Vertical axis," the number of columns or rows is repeated for the number of members included in this member list.
When the member list requires a "Point of View Member," the "Member" field becomes editable (as in the line for "Relative Periods" above), so specify the point of view member.
Member
For dimensions assigned to "Background," specify the member to be applied across the entire report or screen in the "Member" field (as "None" for the "Change Account" row and "Periodical" for the "Views" row above).
Data Import and Translation Table
It’s also possible to import data using Simple Forms. The import data should be in a CSV file format, with key items corresponding to members of dimensions assigned to parameters, horizontal axes, vertical axes, followed by values such as amounts to be imported. Do not include items corresponding to dimensions assigned to "Background" in the key items.
To convert key item values to member labels, you can use a Translation Table. If you want to perform a conversion, specify the translation table to use in the dimension’s "Translation Table" field.
For more details on the data import feature, see Importing with Simple Forms.
Data Export
Data from reports created with Simple Forms can be exported in CSV format. Along with the data content, row and column headers (titles) are also output.
Although Full-featured Forms allow suppressing the output of row and column headers and outputting a "File Header" separately, Simple Forms do not support these features. Other aspects do not differ between Simple and Full-featured Forms.
Reference material: Format of Exported Files (Full-featured Version)
Adjusting the Appearance of Reports
You can also adjust the appearance of the created reports (Display/editing methods for amounts/numbers, Report Size and Unit Indication)(clicking on each tab displays the setting panel).